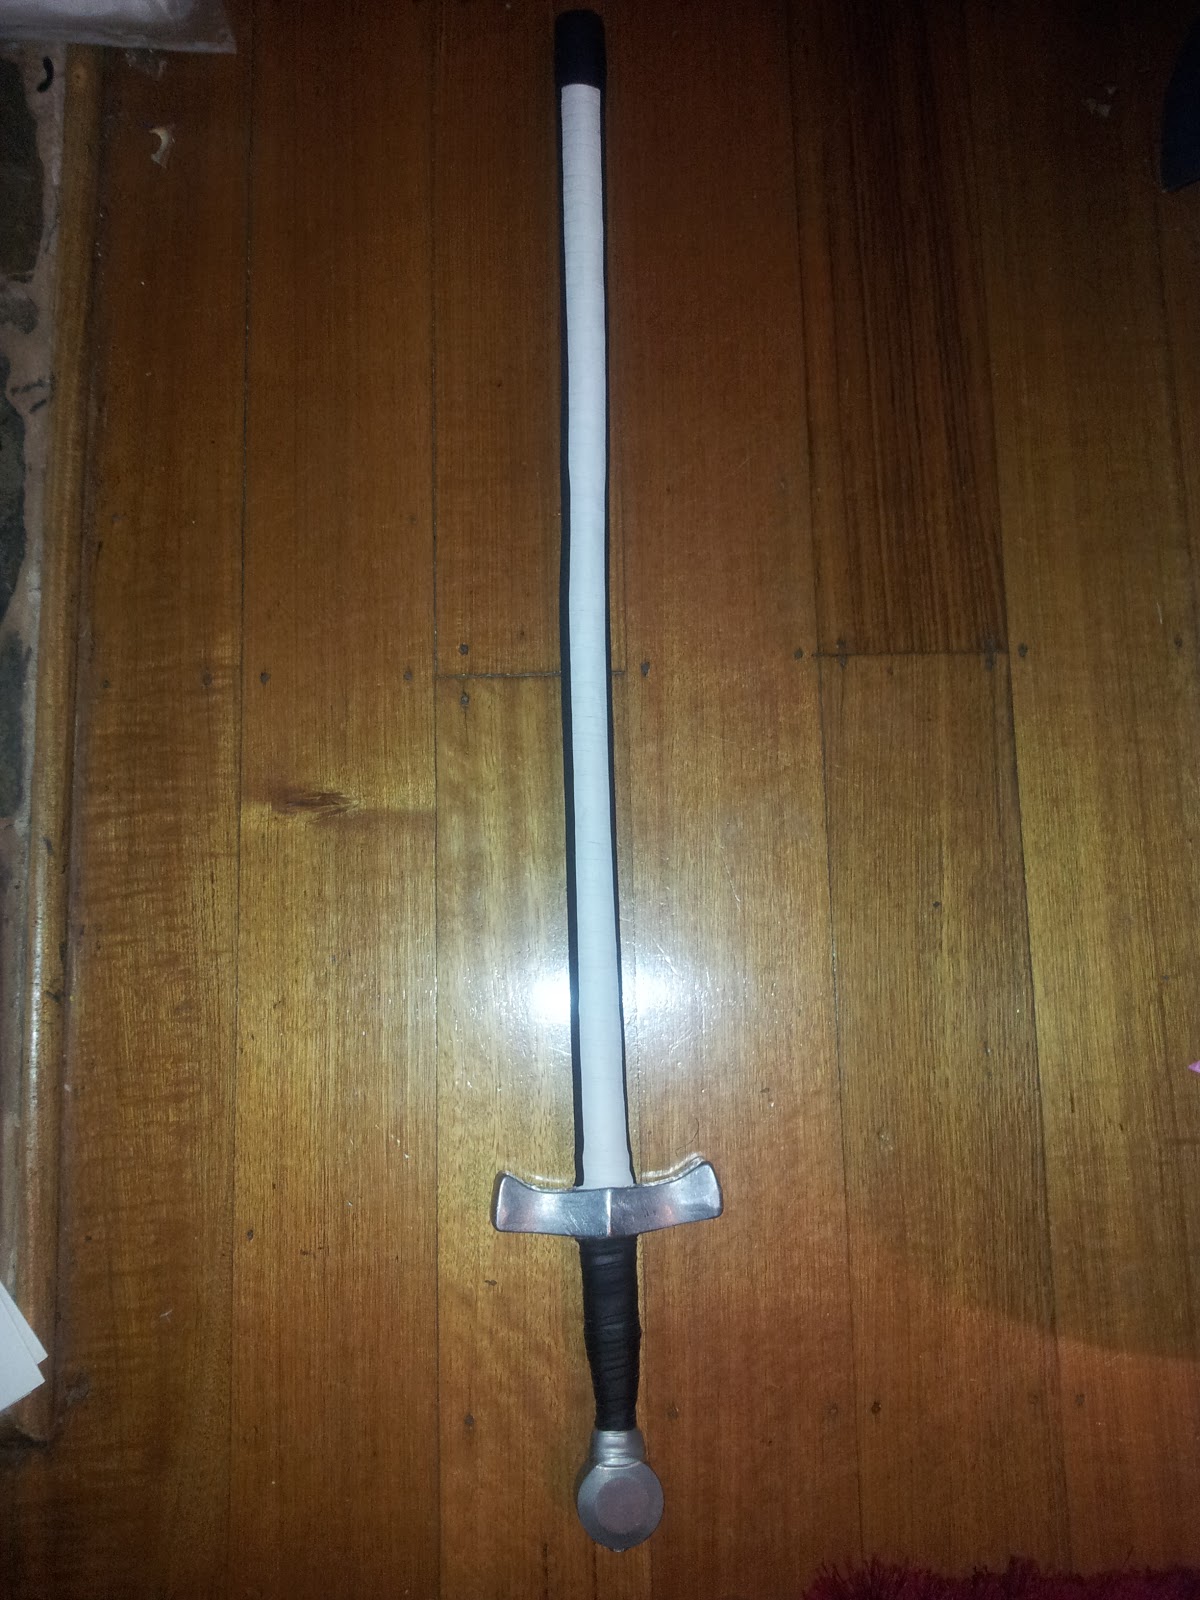
I've made up a new sword for sword and shield style.
I was convinced to try out a basket hilt and demi gauntlet, instead of my usual cross hilt with gauntlet setup.
Original stick of rattan stats :
width 1 3/8 inch
weight 443 grams
length 89.5cm
Black plastic sca basket hilt 303 grams
I shaped the handle and shaved the sides of the blade with an angle grinder.
I wrapped the blade in 1 spiral layer of Fibre tape,
then 1 layer of hockey tape
With hockey tape, I put two layers of 1/2 inch closed cell foam into a low profile thrusting tip. (just over the minimum length).
I taped the basket hilt with some fibre tape and some hockey tape.
Finished weight
840 grams
The final sword is well balanced, light and should let me do damn fast snaps :)
Here are some pictures of my SCA heavy buckler being constructed.
The grip is on the front face, so that the balance of the shield is comfortable.
This reduces the apparent weight of the shield, as it sits in the desired position by itself. This way the larger muscles in your arm are used to hold the shield in position, and the smaller muscles are only engaged if an adjustment is needed.
Here I'm going to talk about what is essentially a set of single sword high guards or blocks. We use these when fighting Florentine, sword and shield, sword and Buckler or even bastard sword however; as they will translate well to most weapon combinations. We've been developing them together from individual techniques developed by others.
Almost all of these blocks are from duke Gaston and duke baldar.
Here they explain their drills, and show most of the blocks:
Block
All blocks are with the strong of the blade. As that is the strongest part of the sword, and it's sca heavy, so there's no edge to ruin.
The wrist should be held straight and strong (as when throwing a punch), when blocking, to block well and prevent wrist damage.
Guards
neutral position - not a block. sword upright in front of sword shoulder at elbow height. Poised to move into any defence.
House - blocks high blows to your sword side. From neutral, move hand out swordwise, facing blade edge mostly outwards, tip should point up and towards your centre.
Tent - protects high attacks to the shield side. From house, push the tip towards shield side and lift hand up towards your head.
Ponytail - protects from high wraps. From tent, move the tip down and your hand moves behind your head, so that the swords is near vertical behind your head.
Shoulder - not a block. the ideal position to start most snap shots from. From ponytail, move your hand to just in front of your sword shoulder, so that the sword can rest on your shoulder.
Outside - protects from high blows to the sword side. From shoulder, bring your hand up and onto your shield side above your head. Your upper arm is horizontal, lower arm near vertical, and the sword completing the other edge of a triangle. Look at your opponent through the middle of that triangle.
Cross - protects from high blows to shield side. From outside, bring your hand down and the tip up, so the sword is near vertical, with the tip slightly back towards centre and the blade facing out and towards your opponent.
Smooth
This sequence can be made into one continuous movement as follows:
Neutral -> house -> tent -> ponytail -> shoulder -> outside -> cross -> neutral and repeat.
With this motion the centre of the swords should stay near the top of the head throughout the movement. You shouldn't pause at each block, it should be a smooth continuous movement.
Then repeat the sequence in reverse :
Neutral -> cross -> outside -> shoulder -> ponytail -> tent -> house -> neutral and repeat.
All interim positions between each block are also blocks, being to block shots coming at different angles.
For instance to block a high vertical slot shot, block with the position between house and tent.
Flip
The house and outside are blocking the same position, and so the sword should be in a similar position It both guards. Tent and cross share the same relationship. From house, flip the sword over so that you go into outside, then back again, then repeat. Do the same with cross and tent.
Push
House can be moved to cross by just pushing your hand across your body, then push back to house. Tent can move to ponytail by pushing the tip around the back, then move into outside by pushing the tip further around. Then reverse that movement.
Lift
From house you lift the sword up to horizontal over your forehead, with your palm facing out, then over into tent, then reverse and repeat. From cross you lift the sword up to horizontal over your forehead (but the with your palm facing you) then over into outside block, reverse and repeat.
Hard or soft
If a block position is held firmly during a block, then we call that a hard block.
If the sword is moved to another position during the block, we call that a soft block.
A hard block will cause the attackers blow to stop, and then bounce back. A soft block doesn't absorb the energy of the blow, it deflects it into another direction. For instance, a house block moved over to tent, will cause the opponents sword to continue over the top of your head.
Close or far
For each of the guards you can hold it close to your body, with the sword close to vertical providing good protection at close range. At longer range It can help to push the tip towards the opponent. This will threaten a thrust, and at the same time change the angle of the block to meet longer range shots. It makes soft blocks a lot easier as well. With the tip held more forward, when you block the shot, bring the tip and the rest of the sword back towards you. This slows down the opponent's shot and deflects it at the same time.
Relation to longsword guards
If the tips are pointed forward more and the hand brought back, these guards become very similar to the traditional longsword guards.
For a right hander:
House - right plow
Cross - left plow
Tent - right ox
Outside - left ox
Shoulder - right shoulder
Ponytail - if you bring it up becomes crown
Shots
From each block there's a torque shot that can be thrown directly from that block.
Tent - block onside, shot onside
House - block offside, shot onside
Cross - block onside, shot offside
Outside - block offside, shot offside
Ponytail - block wrap, shot wrap
So you can see that it covers ever combination of onside/offside shot and block.
Drills
For each guard there are partner drills to practise the block and the corresponding shot. If both partners take tent in matched hands, both in right. Then partner A throws a slow onside head torque, partner B will already be blocking that shot with tent. Partner A returns to tent while partner B throws the same shot, which is blocked by A's tent. Then repeat.
Outside block and ponytail are done the same way, with matched hands. House and cross must be done with mirrored hands left against right, as the hit and block on the same side.
When a partner gets tired, call out switch, and do the same drill with your other hand.
From these basic drills, you can add in more shots or blocks and make them more complicated.
The next step is to do the same drill in full armour, throwing at full speed.
After that we turn the drill into a restricted fight where the only block is the one being practised and the only shot is the one for that block, eg tent and onside head.
It helps you to practise both the block and shot at different ranges and different angles this way.
One aspect of the SCA that is rarely documented is the construction of our training/sport replica swords. This is probably related to a couple of factors, firstly a lot of people put relatively little effort into constructing a sword (as compared to say armour). secondly it is a very personal affair with a lot of varying opinions on what is good and works well. finally it is often learnt off someone else and one might assume that person has published their construction techniques but this is usually not the case. While there are some excellent guides floating around I have just finished constructing some as close to the real thing as practical swords and thought I'd post some tips as a result.
Firstly, choose a sword. Most people tend to use the approach of just long enough to comfortably touch the ground, 1"4 thick, whatever hand protection you prefer.
One big problem in the SCA is callibration, and that in part comes down to not being able to use real swords against real armour. Although such an activity would obviously be life threatening, we should still try to make every effort to get as close to accurate as possible. With that in mind I decided to try a slightly different approach and use a particular reference sword as guidance for as many parameters as possible. I choose to use this http://www.albion-swords.com/swords/albion/nextgen/sword-medieval-hospitaller-xa.htm for inspiration. Albion make some neat swords, in some cases are direct replicas of actual swords, or inspired items such as the hospitaller which has drawn inspiration from several period sources. I selected the Hospitaller sword predominately because it represents a lot of what the SCA is about. There is little specific information on 11th century weapons and so we make a best guess drawing on various sources from the period. This type of sword was likely used against people in something akin to SCA assumed armour and on foot.
The other nice thing about Albion is that all useful statistics on the construction are listed (shamelessy copied below) which provides us with an excellent point of reference for creating a sword rather than just 'a look':
The first thing that amazed me about these numbers was the total length. All my previous swords have been between 75 and 85cm long in total which I thought was quite long. I am 6'2" and 85cm is on the high end of the commonly touted 'long enough to touch the ground comfortably', with a hospitaller with my arms by my sides it rests on the ground approximately 1 foot infront of me.
Secondly the balance point of these swords is around 5inches from the cross. Anyone in the SCA has probably heard every different opinion on balance points so having some specific information here is very interesting. My previous swords balanced around 8inches from the hilt (which was over half way up the blade). I have picked up swords with metal caged basket hilts that balanced at the hilt and some swords which use pewter counter balances that balance at the grip. The balance point is integral in defining how readily the sword can be rotated upon itself (torques) which is a key movement in our fighting style.
Finally the total weight is only 1.2 Kilos. This pretty much rules out any sort of metal basket hilt that I have tried (although you can argue metal gauntlets add just as much anyway) and most counter weight systems.
Construction:
So now I have a clear idea in mind for my new swords I set about construction. The first step is to find some rattan, my sword is straight.. so that was easy. Measuring previous efforts it was clear some minimum thickness rattan wouldn't do to get to the 1.2kilo point so I found some 1.5inch diameter lengths. Each sword was measured up according to Albions stats and marked out. Rather than purchase pommels I opted to increase the total length of the sword slightly and use that as the pommel leaving the possibility of buttspikes if I want try them out while keeping the balance point right.
The sides are planed down in a tapering fashion from almost no shaving 1.5inch to 1.25inch at the tip.
The next process is one of the more important and often overlooked components, the grip. Making a grip based on albion was challenging given the images, however a plastic training sword was used to get some numbers down. In the end my grip is 40cm at the top and 3cm at the smallest. The grip is 3cm thick. This is done predominately using an angle grinder with a general purpose wheel. I start by making deep cuts to get to the right depths less a fraction so that I can finish the grip without compromising strength. with a finish just using 80grit then 400 grit sandpaper.
I mount the cross next which is still a work in progress. I recently acquired some windrose armory pewter crosses. Firstly I built the rattan up to thickness using hockey strapping tape such that the cross only just slid into position (5 loops). By drilling through the side, a cut down bolt can be used to fasten the cross to the sword.
Next a layer of packing tape (which is clear and has small fibres embedded, 3m product number XXXX) is carefully woven around the blade. This is important as it stops the rattan ever being exposed after damage (which will occur). This both improves the longevity of your swords and makes it a simple matter to repair by adding more surface covering. The surface covering is hockey strapping tape which was sourced from XXX. It is great because it is slightly lighter while being as durable as duct tape. I also think it looks better ;).
The grip can now be covered. I use tennis racket grip tape which can be had for 3$ for a pack of 3, but there are many similar products that could be used instead. It is important to make sure the finish is good because roughness under the grip tape will come through and both deteriorate the tape faster and be less comfortable. The tape is simply wound around tightly and affixed to the sword with hockey strapping tape. I put a slice of leather under the gripping tape at the point where my index and ring fingers grip to give a textural feel which aids in keeping the sword gripped in the right location without having to look down and check. For these swords I opted for yet another loop of hockey strapping tape for something different.
Finally I put the thrusting tip on which is 4 pieces of 1/4 inch closed cell foam (on the harder side) wrapped up by, you guessed it, hockey strapping tape. Even if you choose to use duct tape for your swords, I would recommend this approach to thrusting tips as I am notorious for breaking the things, and I haven't managed to break this design yet. The hockey tape keeps the thrusting tip flexible even after repeated use.
Summary:
After completing my swords the first thing that struck me was the accuracy of the numbers to the original reference sword. My SCA legal swords are 1.2 kilos each, have a balance point around 5 inches from the cross, have a blade that is 86cm and a grip that is 16cm. The most important factor I think in getting close to realistic sword specs, is to use thick rattan. 1.5inch is definately a good place to start, not only does the total weight come out close but you wont suffer from 'whippy' swords that move fast but will have opponents calling lights due to the rattan flexing. I have also found that the Windrose pommels are good in pewter, but for even better weighting, aluminium cross and pommel might be better and will be the next design I try.
NOTE: I took the photos after the majority of the work was done, so some of the photos are actually of a different piece of rattan, different cross or pommel.
sword shape
Ideally the rattan is already at around 1.25" diameter with the skin on (for strength and durability). If it's not, we will generally shave down the sides (not the blade) to lighten the rattan, and give it a more sword-like shape. Use a spoke shave, or plane, or angle grinder can work too. Make sure your cross will actually fit on the rattan.
grip
I based the grip on my synthetic waster from cold steel. Which is tapered towards the pommel, but flat in profile; with a thin center indicator raised section. The pommel is similar too.
Place your cross on the sword and mark out where the grip will be, as well as the cross. Use the angle grinder to make the grip shaped like the pictures below. Leave a short section for the pommel to attach to.
pommel
The pommels I got had a rounded shape, but I wanted to make sure that the pommel wouldn't twist on the sword. The idea is to square out the hole in the pommel. I used the file on the sides so that there were large notches in either side. I then made the corresponding shape on the rattan end, so that when the pommel is placed on the stick, it can't twist at all. After a small pilot hole is drilled, the pommel can then screw into the end, and won't move at all.
cross
The cross was also a round shape, and it's even more important that it doesn't twist. I used the file to make the blade edge sides flat. I also flattened the blade sides on the rattan, where the cross would sit. This way, with a small wedge of wood jammed between the cross and the stick, where the flat sections are; the cross would be held in place. I added some glue in the gaps to help hold it all in place, and covered it all with duct tape so I didn't get glue everywhere. I then left it to dry overnight
tape
I cover the blade in one layer of fibre tape, twisting around the stick. I added an extra lengthwise strip to the blade edge.
A single layer of silver duct tape is then wrapped around the blade, followed by thin, black blade tape.
I used black tennis racket grip tape on the grip. It tends to help grip the sword, and provides a small amount of shock absorption.
thrusting tip
I cut three discs of high density closed cell foam, slightly larger in diameter than the rattan, and tape it to the end of the stick with fibre tape. These low-profile thrusting tips only last about 3 training sessions, but they're easy to tape back on; and they weigh almost nothing.
In this photo, I've tried to glue a fourth disc on the outside, to help prevent thrusts from slipping (due to the tape surface), (which you can see duct tape to help the gluing process). This doesn't work very well though, as the glue I used doesn't stick to the fibre tape.
As you can see from the last picture, my gauntlet fits almost exactly between the pommel and cross. My hand has some room to move within the gauntlet and on the grip however.
We've since bought some hockey stick tape, and retaped our swords with it instead of duct tape. I went for a spiraled taping, giving two layers of tape total.
I think the thrusting tips will last a bit longer, as well as being better looking IMHO. The hockey stick tape has a much rougher surface, so it thrusts should slip a lot less.
I've gone for a white sword with black edge, while gib has gone for the reverse colour scheme.