
Wednesday, December 21, 2011
Thursday, December 15, 2011
On Images and their value.
This one is short but sweet. I have been looking for an online database of actual medieval images with verified dates to do my own research. I have stumbled upon the University of Heidelberg's digital library here: http://www.ub.uni-heidelberg.de/Englisch/helios/digi/handschriften.html
My first interesting image was this: http://digi.ub.uni-heidelberg.de/diglit/cpg848/0047
I have heard a few people talk of helms as being very difficult to attack and demonstrations of helms that for all intents are purposes can not be broken by a sword. This image clearly shows a knight's helm being cloven by a sturdy strike.
Wednesday, November 30, 2011
cross training
We've been doing a fair bit of cross training lately.
Poi for training sweeping circling cuts, and wrist and arm flexibility.
Boxing for training straight wrist in shots and sword blocks, as well as punch shots and power generation.
Hula hoop for training flexible hip rotation and movement in power generation.
A little bit of epee practice, to help with thrust placement and theory.
Weights for strength, and exercise bike for cardio.
Has your sword lost its pop?
When I used to skateboard, the main element of pretty much any trick was the Ollie. An Ollie involves kicking the laminated wood skateboard hard against the ground so it pops back into the air; once in the air you manipulate the board to spin or turn or whatever trick it is. A new board has a certain amount of 'pop' a subjective measure of how easily it 'pop's into the air, but after a while as the wood slowly breaks down or as the glue loosens, the board gradually "loses its pop" and at that point you can't Ollie as high, and you have to kick harder to get the same height. If you keep using that board it will break. It'll last some time in that less poppy state, but you just won't be skating as well.
The exact same wear process happens with the rattan swords we use in SCA heavy.
When you first make up a new sword it's rigid and hits hard and makes a clean smack sound when it hits. This is the same as a new board's pop. People will notice when their rattan starts to break and when it has gone mushy, which is the broken state, but it's important to know when it has lost its "pop".
When that happens you'll need to hit harder and the sound when it hits will become more dull.
If you're at the top of your game, just like the pro skater, you may want to just stop using it once it's lost its pop; rather than waiting for the rattan to break down completely. Assuming you have a good rattan supply.
Even if you can't get a new stick, it is worth being aware of the stick losing its pop, so that you can adjust your power levels. You can't make it hit the same as it did when it was new, but it helps to be aware of it.
So the question is, has your current sword lost its pop?
Friday, November 11, 2011


Tuesday, November 8, 2011
High sword blocks
Here I'm going to talk about what is essentially a set of single sword high guards or blocks. We use these when fighting Florentine, sword and shield, sword and Buckler or even bastard sword however; as they will translate well to most weapon combinations. We've been developing them together from individual techniques developed by others.
Almost all of these blocks are from duke Gaston and duke baldar.
Here they explain their drills, and show most of the blocks:
Block
All blocks are with the strong of the blade. As that is the strongest part of the sword, and it's sca heavy, so there's no edge to ruin.
The wrist should be held straight and strong (as when throwing a punch), when blocking, to block well and prevent wrist damage.
Guards
neutral position - not a block. sword upright in front of sword shoulder at elbow height. Poised to move into any defence.
House - blocks high blows to your sword side. From neutral, move hand out swordwise, facing blade edge mostly outwards, tip should point up and towards your centre.
Tent - protects high attacks to the shield side. From house, push the tip towards shield side and lift hand up towards your head.
Ponytail - protects from high wraps. From tent, move the tip down and your hand moves behind your head, so that the swords is near vertical behind your head.
Shoulder - not a block. the ideal position to start most snap shots from. From ponytail, move your hand to just in front of your sword shoulder, so that the sword can rest on your shoulder.
Outside - protects from high blows to the sword side. From shoulder, bring your hand up and onto your shield side above your head. Your upper arm is horizontal, lower arm near vertical, and the sword completing the other edge of a triangle. Look at your opponent through the middle of that triangle.
Cross - protects from high blows to shield side. From outside, bring your hand down and the tip up, so the sword is near vertical, with the tip slightly back towards centre and the blade facing out and towards your opponent.
Smooth
This sequence can be made into one continuous movement as follows:
Neutral -> house -> tent -> ponytail -> shoulder -> outside -> cross -> neutral and repeat.
With this motion the centre of the swords should stay near the top of the head throughout the movement. You shouldn't pause at each block, it should be a smooth continuous movement.
Then repeat the sequence in reverse :
Neutral -> cross -> outside -> shoulder -> ponytail -> tent -> house -> neutral and repeat.
All interim positions between each block are also blocks, being to block shots coming at different angles.
For instance to block a high vertical slot shot, block with the position between house and tent.
Flip
The house and outside are blocking the same position, and so the sword should be in a similar position It both guards. Tent and cross share the same relationship. From house, flip the sword over so that you go into outside, then back again, then repeat. Do the same with cross and tent.
Push
House can be moved to cross by just pushing your hand across your body, then push back to house. Tent can move to ponytail by pushing the tip around the back, then move into outside by pushing the tip further around. Then reverse that movement.
Lift
From house you lift the sword up to horizontal over your forehead, with your palm facing out, then over into tent, then reverse and repeat. From cross you lift the sword up to horizontal over your forehead (but the with your palm facing you) then over into outside block, reverse and repeat.
Hard or soft
If a block position is held firmly during a block, then we call that a hard block.
If the sword is moved to another position during the block, we call that a soft block.
A hard block will cause the attackers blow to stop, and then bounce back. A soft block doesn't absorb the energy of the blow, it deflects it into another direction. For instance, a house block moved over to tent, will cause the opponents sword to continue over the top of your head.
Close or far
For each of the guards you can hold it close to your body, with the sword close to vertical providing good protection at close range. At longer range It can help to push the tip towards the opponent. This will threaten a thrust, and at the same time change the angle of the block to meet longer range shots. It makes soft blocks a lot easier as well. With the tip held more forward, when you block the shot, bring the tip and the rest of the sword back towards you. This slows down the opponent's shot and deflects it at the same time.
Relation to longsword guards
If the tips are pointed forward more and the hand brought back, these guards become very similar to the traditional longsword guards.
For a right hander:
House - right plow
Cross - left plow
Tent - right ox
Outside - left ox
Shoulder - right shoulder
Ponytail - if you bring it up becomes crown
Shots
From each block there's a torque shot that can be thrown directly from that block.
Tent - block onside, shot onside
House - block offside, shot onside
Cross - block onside, shot offside
Outside - block offside, shot offside
Ponytail - block wrap, shot wrap
So you can see that it covers ever combination of onside/offside shot and block.
Drills
For each guard there are partner drills to practise the block and the corresponding shot. If both partners take tent in matched hands, both in right. Then partner A throws a slow onside head torque, partner B will already be blocking that shot with tent. Partner A returns to tent while partner B throws the same shot, which is blocked by A's tent. Then repeat.
Outside block and ponytail are done the same way, with matched hands. House and cross must be done with mirrored hands left against right, as the hit and block on the same side.
When a partner gets tired, call out switch, and do the same drill with your other hand.
From these basic drills, you can add in more shots or blocks and make them more complicated.
The next step is to do the same drill in full armour, throwing at full speed.
After that we turn the drill into a restricted fight where the only block is the one being practised and the only shot is the one for that block, eg tent and onside head.
It helps you to practise both the block and shot at different ranges and different angles this way.
Friday, October 28, 2011
Thursday, October 13, 2011
Constructing an 11th (ish) century sword

 One aspect of the SCA that is rarely documented is the construction of our training/sport replica swords. This is probably related to a couple of factors,
firstly a lot of people put relatively little effort into constructing a sword (as compared to say armour).
secondly it is a very personal affair with a lot of varying opinions on what is good and works well.
finally it is often learnt off someone else and one might assume that person has published their construction techniques but this is usually not the case.
While there are some excellent guides floating around I have just finished constructing some as close to the real thing as practical swords and thought I'd post some tips as a result.
Firstly, choose a sword. Most people tend to use the approach of just long enough to comfortably touch the ground, 1"4 thick, whatever hand protection you prefer.
One big problem in the SCA is callibration, and that in part comes down to not being able to use real swords against real armour. Although such an activity would obviously be life threatening, we should still try to make every effort to get as close to accurate as possible. With that in mind I decided to try a slightly different approach and use a particular reference sword as guidance for as many parameters as possible. I choose to use this http://www.albion-swords.com/swords/albion/nextgen/sword-medieval-hospitaller-xa.htm for inspiration. Albion make some neat swords, in some cases are direct replicas of actual swords, or inspired items such as the hospitaller which has drawn inspiration from several period sources. I selected the Hospitaller sword predominately because it represents a lot of what the SCA is about. There is little specific information on 11th century weapons and so we make a best guess drawing on various sources from the period. This type of sword was likely used against people in something akin to SCA assumed armour and on foot.
The other nice thing about Albion is that all useful statistics on the construction are listed (shamelessy copied below) which provides us with an excellent point of reference for creating a sword rather than just 'a look':
Specifications
Total length: 40" (102 cm)
Blade length: 33.75" (86 cm)
Blade width: 1.88" (4.8 cm)
CoG: 5.25" (13 cm)
CoP: 22" (56 cm)
Weight: 2 lbs 10.2 oz (1.2 kilos)
The first thing that amazed me about these numbers was the total length. All my previous swords have been between 75 and 85cm long in total which I thought was quite long. I am 6'2" and 85cm is on the high end of the commonly touted 'long enough to touch the ground comfortably', with a hospitaller with my arms by my sides it rests on the ground approximately 1 foot infront of me.
Secondly the balance point of these swords is around 5inches from the cross. Anyone in the SCA has probably heard every different opinion on balance points so having some specific information here is very interesting. My previous swords balanced around 8inches from the hilt (which was over half way up the blade). I have picked up swords with metal caged basket hilts that balanced at the hilt and some swords which use pewter counter balances that balance at the grip. The balance point is integral in defining how readily the sword can be rotated upon itself (torques) which is a key movement in our fighting style.
Finally the total weight is only 1.2 Kilos. This pretty much rules out any sort of metal basket hilt that I have tried (although you can argue metal gauntlets add just as much anyway) and most counter weight systems.
Construction:
So now I have a clear idea in mind for my new swords I set about construction. The first step is to find some rattan, my sword is straight.. so that was easy. Measuring previous efforts it was clear some minimum thickness rattan wouldn't do to get to the 1.2kilo point so I found some 1.5inch diameter lengths.
Each sword was measured up according to Albions stats and marked out. Rather than purchase pommels I opted to increase the total length of the sword slightly and use that as the pommel leaving the possibility of buttspikes if I want try them out while keeping the balance point right.
The sides are planed down in a tapering fashion from almost no shaving 1.5inch to 1.25inch at the tip.
 The next process is one of the more important and often overlooked components, the grip. Making a grip based on albion was challenging given the images, however a plastic training sword was used to get some numbers down. In the end my grip is 40cm at the top and 3cm at the smallest. The grip is 3cm thick. This is done predominately using an angle grinder with a general purpose wheel. I start by making deep cuts to get to the right depths less a fraction so that I can finish the grip without compromising strength. with a finish just using 80grit then 400 grit sandpaper.
  I mount the cross next which is still a work in progress. I recently acquired some windrose armory pewter crosses. Firstly I built the rattan up to thickness using hockey strapping tape such that the cross only just slid into position (5 loops). By drilling through the side, a cut down bolt can be used to fasten the cross to the sword.
Next a layer of packing tape (which is clear and has small fibres embedded, 3m product number XXXX) is carefully woven around the blade. This is important as it stops the rattan ever being exposed after damage (which will occur). This both improves the longevity of your swords and makes it a simple matter to repair by adding more surface covering.
The surface covering is hockey strapping tape which was sourced from XXX. It is great because it is slightly lighter while being as durable as duct tape. I also think it looks better ;).
 The grip can now be covered. I use tennis racket grip tape which can be had for 3$ for a pack of 3, but there are many similar products that could be used instead. It is important to make sure the finish is good because roughness under the grip tape will come through and both deteriorate the tape faster and be less comfortable. The tape is simply wound around tightly and affixed to the sword with hockey strapping tape. I put a slice of leather under the gripping tape at the point where my index and ring fingers grip to give a textural feel which aids in keeping the sword gripped in the right location without having to look down and check. For these swords I opted for yet another loop of hockey strapping tape for something different.
Finally I put the thrusting tip on which is 4 pieces of 1/4 inch closed cell foam (on the harder side) wrapped up by, you guessed it, hockey strapping tape. Even if you choose to use duct tape for your swords, I would recommend this approach to thrusting tips as I am notorious for breaking the things, and I haven't managed to break this design yet. The hockey tape keeps the thrusting tip flexible even after repeated use.
Summary:
After completing my swords the first thing that struck me was the accuracy of the numbers to the original reference sword. My SCA legal swords are 1.2 kilos each, have a balance point around 5 inches from the cross, have a blade that is 86cm and a grip that is 16cm. The most important factor I think in getting close to realistic sword specs, is to use thick rattan. 1.5inch is definately a good place to start, not only does the total weight come out close but you wont suffer from 'whippy' swords that move fast but will have opponents calling lights due to the rattan flexing. I have also found that the Windrose pommels are good in pewter, but for even better weighting, aluminium cross and pommel might be better and will be the next design I try.
Thursday, September 15, 2011
Wednesday, September 14, 2011
Some articles on sca heavy combat
armoured vs unarmoured training
frozen man quarter speed is a kind of slow unarmoured training, where you train to complete a blow. As opposed to every blow being blocked, as is normally the case for quarter speed training.
hints from brandywine
oldcastle sword and shield
on being a new fighter
Bladeswift
polearms
sword and shield manual
heavy combat for short people
primer on defense
everything SCA combat
Wednesday, August 31, 2011
Single Sword construction
Here's how I put together my latest set of swords for SCA heavy florentine (two-sword)
These are pretty long swords, in fact they are almost longsword (bastard sword) length.
I was aiming for something along the lines of the albion poitiers XV style sword in terms of length, weight and balance.
The final measurements are:
overall length : 105cm
blade length 84cm
center of balance 4.5cm from cross
overall weight 1.1kg
Parts required:
1.25" diameter rattan approx 1m length
square Cross aluminium 0.75 pounds
Wheel pommel pewter 0.8 pounds
silver duct tape or white hockey stick tape
black blade tape or black hockey stick tape
glass fibre tape
tennis racket grip tape
quick grip glue
high density closed cell foam
Tools required:
spoke shave
angle grinder
clamps
drill
file
mallet/hammer
NOTE: I took the photos after the majority of the work was done, so some of the photos are actually of a different piece of rattan, different cross or pommel.
- sword shape
Ideally the rattan is already at around 1.25" diameter with the skin on (for strength and durability). If it's not, we will generally shave down the sides (not the blade) to lighten the rattan, and give it a more sword-like shape. Use a spoke shave, or plane, or angle grinder can work too. Make sure your cross will actually fit on the rattan.
- grip
I based the grip on my synthetic waster from cold steel. Which is tapered towards the pommel, but flat in profile; with a thin center indicator raised section. The pommel is similar too.
Place your cross on the sword and mark out where the grip will be, as well as the cross. Use the angle grinder to make the grip shaped like the pictures below. Leave a short section for the pommel to attach to.


- pommel
The pommels I got had a rounded shape, but I wanted to make sure that the pommel wouldn't twist on the sword. The idea is to square out the hole in the pommel. I used the file on the sides so that there were large notches in either side. I then made the corresponding shape on the rattan end, so that when the pommel is placed on the stick, it can't twist at all. After a small pilot hole is drilled, the pommel can then screw into the end, and won't move at all.


- cross
The cross was also a round shape, and it's even more important that it doesn't twist. I used the file to make the blade edge sides flat. I also flattened the blade sides on the rattan, where the cross would sit. This way, with a small wedge of wood jammed between the cross and the stick, where the flat sections are; the cross would be held in place. I added some glue in the gaps to help hold it all in place, and covered it all with duct tape so I didn't get glue everywhere. I then left it to dry overnight


- tape
A single layer of silver duct tape is then wrapped around the blade, followed by thin, black blade tape.
I used black tennis racket grip tape on the grip. It tends to help grip the sword, and provides a small amount of shock absorption.


- thrusting tip
In this photo, I've tried to glue a fourth disc on the outside, to help prevent thrusts from slipping (due to the tape surface), (which you can see duct tape to help the gluing process). This doesn't work very well though, as the glue I used doesn't stick to the fibre tape.


As you can see from the last picture, my gauntlet fits almost exactly between the pommel and cross. My hand has some room to move within the gauntlet and on the grip however.
We've since bought some hockey stick tape, and retaped our swords with it instead of duct tape. I went for a spiraled taping, giving two layers of tape total.


I've gone for a white sword with black edge, while gib has gone for the reverse colour scheme.

We've since bought some hockey stick tape, and retaped our swords with it instead of duct tape. I went for a spiraled taping, giving two layers of tape total.
I think the thrusting tips will last a bit longer, as well as being better looking IMHO. The hockey stick tape has a much rougher surface, so it thrusts should slip a lot less.

I've gone for a white sword with black edge, while gib has gone for the reverse colour scheme.

Tuesday, August 23, 2011
interesting SCA equipment
Here's some SCA items we're planning on getting.
badger http://armouredbadger.griffin-dor.org/index.php?page=Catalogue
2 hander cross http://www.windrosearmoury.com/zc/index.php?main_page=product_info&cPath=30_64_71&products_id=233
2 hander pommel http://www.windrosearmoury.com/zc/index.php?main_page=product_info&cPath=30_64_72&products_id=243
single cross http://www.windrosearmoury.com/zc/index.php?main_page=product_info&cPath=30_64_71&products_id=598
pommel http://www.windrosearmoury.com/zc/index.php?main_page=product_info&cPath=30_64_72&products_id=240
already have cross
2 hander pommel http://www.windrosearmoury.com/zc/index.php?main_page=product_info&cPath=30_64_72&products_id=243
single cross http://www.windrosearmoury.com/zc/index.php?main_page=product_info&cPath=30_64_71&products_id=237
single pommel aliminium http://www.windrosearmoury.com/zc/index.php?main_page=product_info&cPath=30_64_72&products_id=241
http://www.windrosearmoury.com/zc/index.php?main_page=product_info&products_id=18
http://www.performancearmour.com/helmets.html
http://www.illusionarmoring.com/
Thursday, June 30, 2011
Wednesday, June 15, 2011
Stages of Pell Work
Pell work is significant throughout medieval sword fighting with frequent reference:
Of fight the disciplyne and exercise,
Was this. To have a pale or pile upright
Of mannys light, thus writeth old and wise,
Therewith a bacheler, or a yong knyght,
Shal first be taught to stonde and lerne to fight
And fanne of double wight tak him his shelde'
Of double wight a mace of tre to welde.
This fanne and mace whiche either double wight
Of shelde, and swayed in conflicte, or bataile,
Shal exercise as well swordmen, as knyghtes,
And noe man, as they sayn, is seyn prevaile,
In field, or in castell, though he assayle,
That with the pile, nethe first grete exercise,
thus writeth werrouris olde and wyse.
Have eche his pile or pale upfixed fast
And as it were uppon his mortal foe:
With mightyness and weapon most be cast
To fight stronge, that he ne skape him fro.
On hym with shelde, and sword avised so,
That thou be cloos, and Preste thy foe to smyte,
Lest of thyne own dethe thou be wite.
Empeche his head, his face, have at his gorge,
Beare at the brest, or sperne him on the side,
With myghte knyghtly poost ene as Seynt George,
lepe o thy foe, look if he dare abide;
Will he not flee? Wounde him, make his wounds wide,
Hew of his honde, his legge, his theys, his armys,
Is this the Turk, though he be sleyn, noon harm is.
Cotton library: Titus A, xxiii fol 6 and 7 (early 15th century.)
To this end I have begun using my own pell (simply made from treated pine post, i'll blog it shortly). While reference to why a pell is useful less content is available for exactly what work should be conducted on the pell.
Tuesday, May 24, 2011
Don't Stand Still
Interesting videos on movement
More videos on movement. There's also some explanation of why fighting sword foot forward can be very effective.
How to Train Technique
These short videos are the inspiration for our ideas on how to train a given technique:
Duke Gaston, Duke University:
After watching those videos many, many times we found some older, more in depth videos of the (possibly) complete set of drills:
These Gaston/Baldar drills have inspired us to work all of our initial training for a specific technique into 2 person drills.
The fact that Baldar is right handed and Gaston is a lefty seems to be the reason that they do the sword drills in both hands, but it has an added benefit for us florentine guys; it helps train both hands equally.
So the way we've been training is generating drills for every technique that we want to use, by following these steps:
- Think of a technique, eg moulinet to the head, that you want to improve
- Establish what stance and position you would throw this shot from
- With a partner, at 1/4 speed, do the technique once and complete the technique
- Do the technique again, at 1/4 speed, and have the partner do the corresponding move; eg tent block for the moulinet to the head.
- Make sure you both go back to your starting stance and position
- Then the partner does the technique, and you do the block.
- That is one loop of the drill
- Continue in this loop at 1/4 speed, subtly playing with variations of the strike and block, so that you find the optimal way to perform the technique
- If it's a single sword drill, once that arm gets dead tired, do the drill in the other hand.
- Both partners should be thinking and commenting on their own strike and block, but also each others' as well. One really good way to do this is to film yourselves, and watch the footage afterwards; making sure to decide on what you need to work on next time.
Once you have a set of established drills, you can mix them up, move around while doing the drill, play around with the range, and try them at full speed in armour.
Not only does this sort of drilling help improve techniques you already know, it helps you to always be thinking of new techniques; and new ways to use existing moves.
We've found that drilling techniques this way allows us to deliberately learn techniques a lot quicker than before.
We've found that drilling techniques this way allows us to deliberately learn techniques a lot quicker than before.
Wednesday, May 18, 2011
Florentine Instructional videos
Here's a few florentine instructional videos
Duke Erin
Duke Fuyusuru Tadashi
The Duke Tadashi videos show a style closer to our own, but the Duke Erin videos contain some interesting ideas that I'm trying to incorporate into my own style too.
Sunday, April 17, 2011
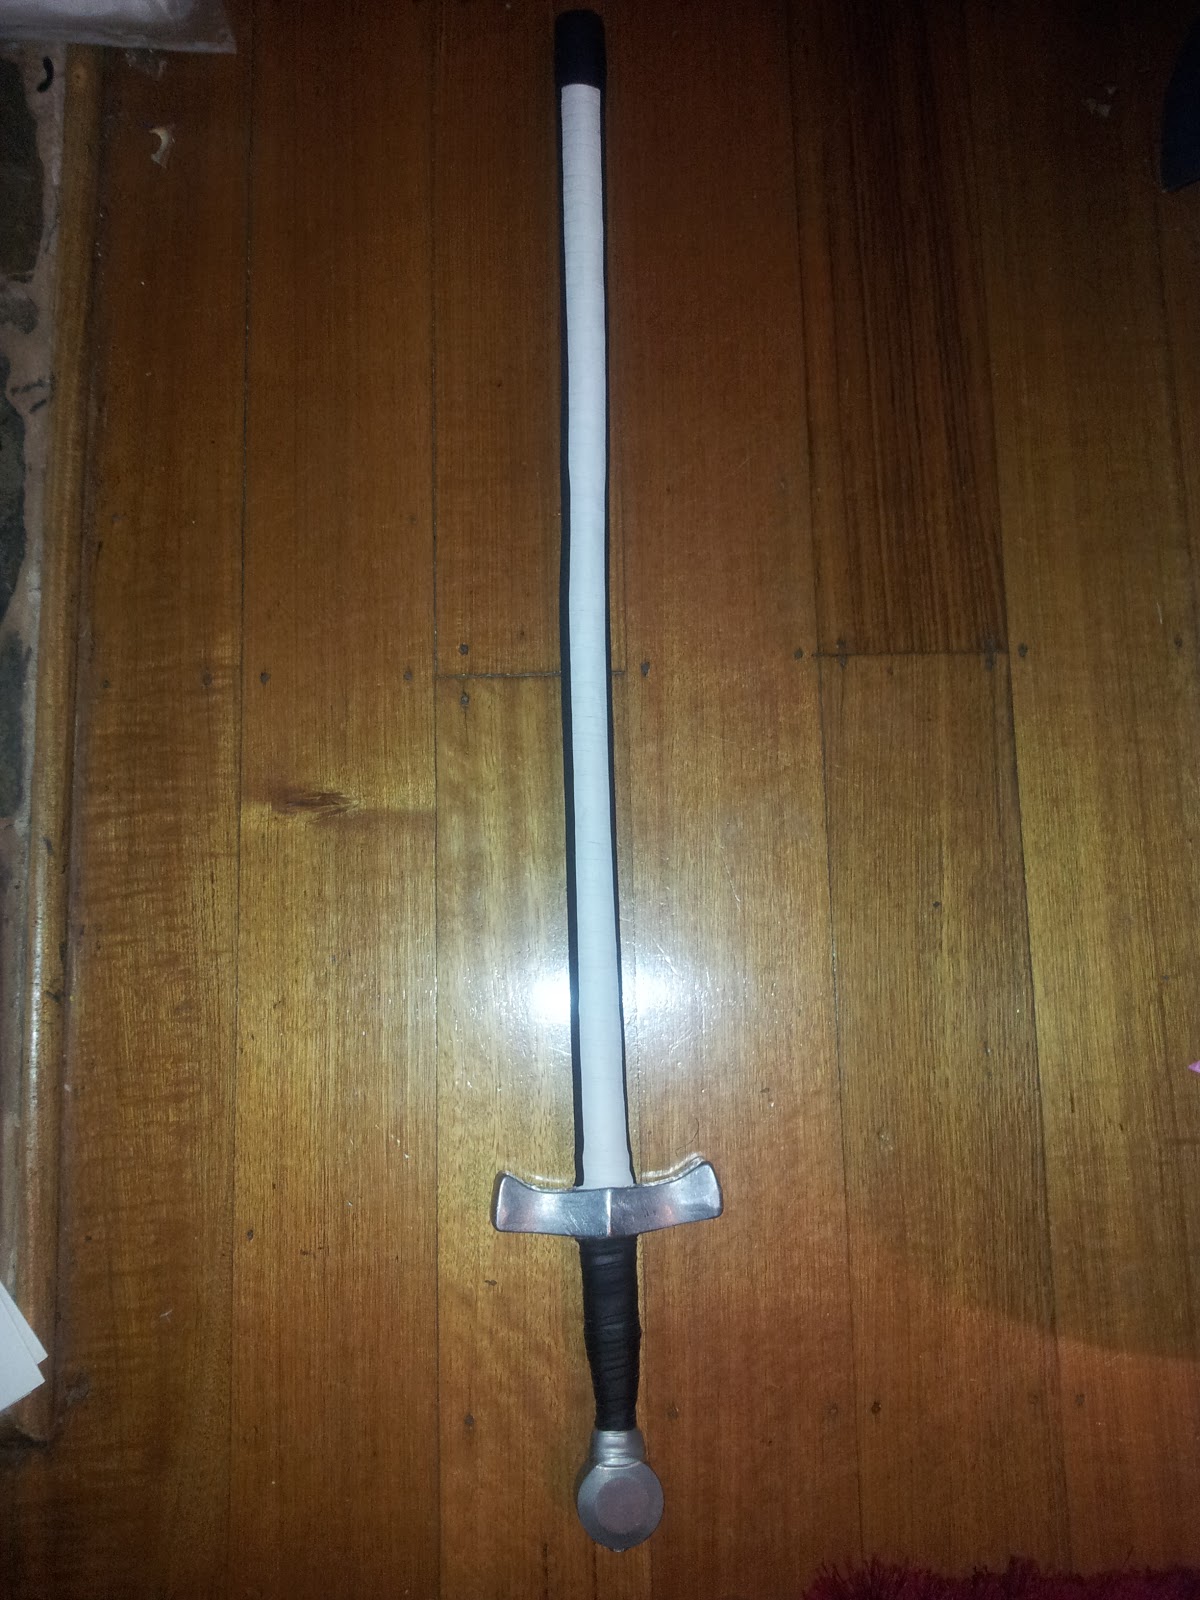
FLAT of my STRONG
Should sword blocks be done with the blade or the flat of the blade?
Can you block with the weak or must it be with the strong?
Some people make it very clear which way is correct:
He's doing unarmoured longsword, which means that you can use both hands' strength as part of the block.
When doing SCA florentine however we only have the strength of a single hand to block with. We have always been told to block with the blade and I think it is for this exact reason.
We will have to try out blocking with the flat of our strong, to determine if it is even possible with single handed swords.
In SCA heavy, we're assumed to be wearing chainmail; which means that light cuts are completely ignored. This means that to block a shot, you only have to take the force out of a blow. You don't have to prevent the blade touching you, only foul the shot. This means that a kind of weak block can be effective with the weak part of the blade.
So it may be possible that we'll end up make a video like the above one, but with us chanting "blade of my weak".
I somehow doubt it though.
Can you block with the weak or must it be with the strong?
 |
| Parts of a sword |
Some people make it very clear which way is correct:
He's doing unarmoured longsword, which means that you can use both hands' strength as part of the block.
When doing SCA florentine however we only have the strength of a single hand to block with. We have always been told to block with the blade and I think it is for this exact reason.
We will have to try out blocking with the flat of our strong, to determine if it is even possible with single handed swords.
In SCA heavy, we're assumed to be wearing chainmail; which means that light cuts are completely ignored. This means that to block a shot, you only have to take the force out of a blow. You don't have to prevent the blade touching you, only foul the shot. This means that a kind of weak block can be effective with the weak part of the blade.
So it may be possible that we'll end up make a video like the above one, but with us chanting "blade of my weak".
I somehow doubt it though.
Wednesday, April 13, 2011
Assumed Armour
As far as I can see, there are several distinct classes of armour worn throughout history that are designed to protect the wearer from sword attacks:
I couldn't find any groups that compete with full plate assumed armour, but I'm sure they exist. The difficulty would be making it safe. The full plate techniques of aiming for thrusts in the unarmoured parts (groin, eyes, palm, underarm) would pretty much always be dangerous at full speed.
- unarmoured / soft leather
- chainmail
- plate mail
There are a few different kinds of attacks with a sword
- cutting - running the edge along the target
- bashing - hitting the target with the edge
- thrusting - penetrating the target with the point
Now it may seem obvious, but the different armour types protect against the different attacks to varying degrees.
Unarmoured or soft leather gives virtually no protection, and arguably thrusting is the most effective attack.
Chainmail mostly provides protection from cutting, some from bashing; but little from thrusting.
Plate mail provides total protection from cutting, good from bashing, and good from thrusting (except in the gaps, obviously). These are clearly over simplifications, but they can help to think of the optimal attack strategy.
Different sword fighting schools assume differently armoured targets. In competition, people generally wear more armour than the "assumed armour" for safety and (in sca heavy) looking better. Here's some examples of the assumed armour of different schools.


I couldn't find any groups that compete with full plate assumed armour, but I'm sure they exist. The difficulty would be making it safe. The full plate techniques of aiming for thrusts in the unarmoured parts (groin, eyes, palm, underarm) would pretty much always be dangerous at full speed.
The point is, striking techniques used by different groups must be understood in terms of the armour they are designed to be used against, not necessarily the armour people compete in. It's pointless comparing the slashes of eskrima to the snaps in sca, or the half-sword thrusting technique to thrusting in modern fencing; they were designed to work around different levels of passive defense.
With this in mind, the SCA heavy techniques of "hitting" the target make a lot of sense. Thrusts however, have always been a source of confusion for me. With a two handed weapon, it's easy enough to get a "good" thrust; but with a single handed sword it seems quite difficult. I was always told that it can't be a "push" but must be a strike. After seeing some videos on youtube which showed how easily a broadsword can thrust through chainmail, I've come to think that thrusts should be more effective in sca heavy combat. Maybe all that should be required is a strong "push" with the thrust. I'm pretty certain that the foam/rubber thrusting tips we use, make it difficult to judge a good thrust to begin with. Also I've found it impossible to find a legal thrusting tip that doesn't completely change the weighting of the sword, making it tip heavy; when really it should be lighter at the point. It seems the thrusting tip requirements have been reduced in the last year or so, which is a good thing. I hope at some point we can use a simple leather cap, or just thrust with the rattan; for single handed swords at least.
Brion of Bellatrix
Information from over the seas is oft hard come by, however word of the deeds of Brion of Bellatrix has reached our shore. I was interested to discover this youtube video of Brion demonstrating pell work.
In particular there is some interesting advice here regarding training with two swords using a 'parallel' method. In this drill, one does the same movements of their preferred drills (on a pell or partner) however instead of striking with one sword, the practitioner uses both swords tracking adjacent at the same area of the pell (or partner). naedyr and myself have recently discovered this technique independently and it has highlighted both our common mistakes and some new and interesting shot possibilities. We aim to upload a video of some of these drills.
In particular there is some interesting advice here regarding training with two swords using a 'parallel' method. In this drill, one does the same movements of their preferred drills (on a pell or partner) however instead of striking with one sword, the practitioner uses both swords tracking adjacent at the same area of the pell (or partner). naedyr and myself have recently discovered this technique independently and it has highlighted both our common mistakes and some new and interesting shot possibilities. We aim to upload a video of some of these drills.
Tuesday, April 12, 2011
Fechtbücher
Here's some fight-books I've been reading recently:
- Sigmund-Ringecks-Knightly-Arts-Combat - medieval wrestling, fighting in full plate mail, wrestling in full plate mail, and more wrestling. The double knee ball drop is a nasty technique.
- Fighting-German-Longsword - Step by step lessons on Johannes Liechtenauer two-handed sword techniques.
- Lessons-Broad-Single-Fighting - An interesting 19th century (?) book which describes a form of stick fighting which sounds very similar to SCA heavy fighting, along with sabre fencing and stick based self defense.
- Samurai-Rings-Hagakure-Bushido-Japan - A very interesting read on Miyamoto Musashi's approach to fighting, along with what I found to be complete uninteresting essays on bushido.
- Medieval-Art-Sword-Shield-Armouries - I'm hoping these sword/buckler techniques can be applied to florentine fighting.
- Medieval-Swordsmanship-Illustrated-Methods-Techniques - a collection of medieval fighting techniques.

Subscribe to:
Comments (Atom)